New Account Setup Instructions
Open Microsoft Outlook 2010. Click on the the File Menu and choose Info and then select Account Settings.
Select Account Settings
In the Account Settings dialog box, on the E-mail tab, click NEW.

Choose the E-mail Account option on the Choose Service Screen and then click Next.

On the Auto Account Setup page, DO NOT enter any information. Instead at the bottom of the page, click the Manually configure server settings or additional server types check box. Click Next.

Choose the Internet E-mail option on the Choose Service Screen and then click Next.

On the Internet E-mail Settings page, specify the following email account information. If you do not yet have your email login details, you should either retrieve the by entering your CPanel account (via Secure Account -> Quick Server Logins -> Email Accounts), OR in the same location (CPanel) creating a new email account click here.
User Information
Your Name: (Enter your first and lasst name, or your business name. This is the name people will see when you email them, Eg. Joe Bloggs)
Email Address: (Specify your email address. This must be accurate for you to receive reply emails, Eg. joe@yourdomain.com.au)
Server Information
Account Type: (Choose POP3 by default, if you have applied for an IMAP account choose the IMAP option.)
Incoming Mail Server: (Enter the incoming server details for your email account, normally in the following format, Eg. mail.yourdomain.com.au)
Outgoing Mail Server: (Enter your outgoing email server, normally the mail server of your Internet Service Provider (ISP), Eg. mail.yourisp.com.au)
Logon Information
User Name: (Enter your email account username, Eg. company.username
Password: (Enter your email account password)
- Tick the Remember password check box so that you do not have to keep typing your password

After you have entered your account login information, click the Test Account Settings button.
If all outlook tests complete successfully, then close the test window, click Next and then click Finish to complete the new account setup wizard.
Your email account is now setup!
Outlook More Settings Dialog
Outlook 2007 has advanced email account settings available under the More Settings button on the Internet Email Settings page of your email account. To access More Settings in Outlook 2007, select the Tools menu, choose Account Settings. On the E-mail tab double-click your email account in the list, and then click the More Settings button.
Below is an overview of the settings available under the More Settings section.
General Settings Tab
On the General Settings tab you can change the name of your email account as it appears in the list of email accounts in Outlook Account settings. You can also optionally specify your business or organisation name. Do NOT specify a Reply E-mail address unless you want return emails to get sent to an email address other than the one you are currently using (Not Recommended).

Outgoing Server Tab
If you have a desktop computer and are using your internet service providers (ISP) outgoing email server setting you will NOT require the outgoing SMTP authentication option on this section. If however you have applied for an SMTP enabled email account service with Webvault, then tick the, My outgoing server (SMTP) requires authentication checkbox.

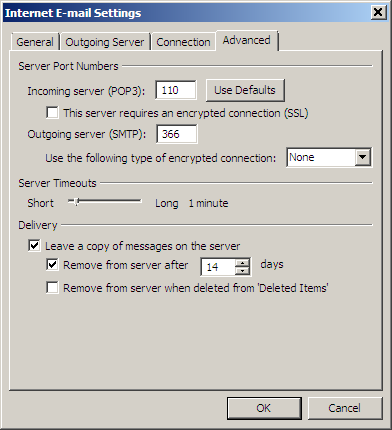
Advanced Settings Tab
If you are using an SMTP enabled email account with WishingWell then it is recommended that you change the Outgoing Server (SMTP) port on the Advanced tab from the default 25 to 587. This will allow you to bypass firewall restrictions that most internet access providers impose on connections to remote mail servers. If you are using your ISPs default outgoing email server setting, then you should NOT adjust the settings on this page.
You can also download your email from WishingWell servers using secure SSL encryption by ticking the This server requires an encrypted connection (SSL) checkbox under the POP3 section.
If you have an SMTP enabled email account with WishingWell, you can also use the secure TLS encryption option under the Outgoing Server settings on the advanced tab using the Outgoing Server (SMTP) port 465.


